背景
Terraform - Associate に一発合格したのでそれについて述べていきます。
学習材料
Terraform Associate Tutorialを一周し、こちらのUdemyの問題集を2周しました。
以下の試験用メモセクションは自分なりに調べてまとめた集大成のようなものなので、それを活用するのも有効です。
感想
それほど難しくないかと思います。60分で57問の英語試験ですが、基本的に問題文は長くなく、パッパと答えられるようになっています。私は35分くらいで解き終わって特に見直しもせずに提出しました。提出直後に合格していればPASSと表示されます。
試験環境はオンラインのみ対応です。特につまづくこともなく、チャットにある指示通りに身分証明書や机の上、身の回りを見せてあげれば良いです。
試験用メモ
Terraform command
terraform version
Display the currently installed version of Terraform on your system.
Run terrafom init with a constraint from the configuration file, then remove the constraint and run again.
Terraform would use the existing module already downloaded because once a specific version is downloaded, Terraform caches it locally. If the version parameter is removed, Terraform will continue to use the cached version unless explicitly updated.
terraform init -migrate-state
Running terraform init -migrate-state is the correct command to migrate the state file to the new Amazon S3 remote backend. This command initializes the backend configuration and migrates the existing state to the specified backend.
terraform {
  backend "s3" {
    bucket = "tf-bucket"
    key = "terraform/krausen/"
    region = "us-east-1"
  }
}
terraform init -upgrade
The -upgrade flag will upgrade all previously-selected plugins and modules to the newest version that complies with the configuration's version constraints. This will cause Terraform to ignore any selections recorded in the dependency lock file, and to take the newest available version matching the configured version constraints.
terraform get
Download and update modules for a Terraform configuration. It can be used to update specific modules by specifying the module name and version number, or it can be used to update all modules by simply running the command without any arguments.
Difference with terraform init
-
terraform initis the all-encompassing command to initialize a Terraform project (sets up providers, modules, backend, etc.). -
terraform getis more specific, used to manage and update only modules that your Terraform configuration relies on.
If you want upgrade provider, you have to runterraform init -upgrade.
terraform fmt -recursive
Use the -recursive flag to process files in subdirectories. By default, only the given or current directory is processed.
terraform import
The terraform import command is used to import existing resources into Terraform. This allows you to take resources that you’ve created by some other means and bring them under Terraform management.
参考: import と -refresh-only の違い
- Objective:
-
terraform import: Brings existing resources into Terraform management. -
terraform plan -refresh-only: Updates Terraform’s state file with the latest data from the actual infrastructure.
-
- State Modification:
-
terraform import: Modifies the Terraform state by adding the imported resource. -
terraform plan -refresh-only: Modifies the state file by refreshing the state but does not add new resources.
-
- Configuration Changes:
-
terraform import: Requires manual creation of configuration files to match the imported resource. -
terraform plan -refresh-only: Does not require any changes to the configuration files. It just refreshes the state based on what exists in the provider.
-
In short:
- Use
terraform importto bring an existing resource under Terraform's management. - Use
terraform plan -refresh-onlyto ensure your state file is up-to-date with the actual resources, without changing or importing anything.
terraform state mv
You can use terraform state mv when you wish to retain an existing remote object but track it as a different resource instance address in Terraform, such as if you have renamed a resource block or you have moved it into a different module in your configuration.
In this case, Terraform would not touch the actual resource that is deployed, but it would simply attach the existing object to the new address in Terraform.
terraform state show <SPECIFIC_RESOURCE_ADDRESS>
Show you a lot of details on the resource, including things like the ID, IP address, the state of the resource, and lots more.
ex). terraform state show aws_instance.frontend
terraform workspace new <NEW_WORKSPACE>
This command will create a new Terraform workspace named <NEW_WORKSPACE>. The user can then switch to the new workspace using the terraform workspace select command and use it to manage resources in the new environment.
terraform workspace show
Display the current workspace you are working in when using Terraform CLI/Community workspaces. It provides information about the currently selected workspace, allowing you to confirm the context of your operations.
terraform workspace select <WORKSPACE>
Terraform workspaces allow you to manage multiple sets of infrastructure resources that share the same configuration. To switch to a specific workspace in Terraform, you use the terraform workspace select command followed by the name of the workspace you want to switch to.
terraform show
Provide human-readable output from a state or plan file. This can be used to inspect a plan to ensure that the planned operations are expected, or to inspect the current state as Terraform sees it.
Machine-readable output can be generated by adding the -json command-line flag.
Note: When using the -json command-line flag, any sensitive values in Terraform state will be displayed in plain text.
terraform plan -out
The -out flag in Terraform is used to save the plan generated by the terraform plan command. By specifying this flag followed by a file path, you can save the plan to a file that can be applied later using the terraform apply command. This is the correct way to save a plan for future application.
ex).
terraform plan -out=<FILE_NAME>
Multiple users attempt to run a terraform apply simultaneously when using a remote backend
If the remote backend does not support locking mechanisms, multiple users running terraform apply simultaneously can lead to conflicts and potential corruption of the state file.
When using a remote backend, if the backend supports locking, the first user to run a terraform apply will lock the state file, preventing any other users from making changes simultaneously. The second user's terraform apply will return an error that the state is locked.
terraform apply with a few resources failed.
During a terraform apply, any resources that are successfully provisioned are maintained as deployed.
On the other hand, resources that failed during the provisioning process, such as a provisioned, will be tainted to be recreated during the next run.
terraform apply -destroy
Achieve the same result as the terraform destroy command.
terraform apply -refresh=false
Prevent Terraform from refreshing the state of the infrastructure resources before applying changes. By default, Terraform checks the current state of resources in the infrastructure to ensure that it has the latest information before making any modifications. However, using the -refresh=false flag disables this behavior, instructing Terraform to use the existing state without refreshing it. This can be useful in situations where you want to apply changes quickly without waiting for Terraform to check the current state of the infrastructure, especially if you're confident that the state is already up to date. However, it's important to use this option cautiously, as it may lead to unintended consequences if the state of the infrastructure is not accurate.
terraform login
It allows you to authenticate with HCP Terraform or Terraform Enterprise. This is necessary for securely managing remote state and for collaborating with other team members on the same project.
terraform console
Read the Terraform configuration in the current working directory and the Terraform state file from the configured backend and interactively evaluate and experiment with expressions in your Terraform configuration. It provides a way to test and validate the output of expressions before applying them to your infrastructure.
In order to use this command, the CLI must be able to lock the state to prevent changes, ensuring that the state remains consistent during the interactive exploration process.
ex).
terraform console> data.aws_instances.instances.ids[*]
[
"i-01e56922222222222",
"i-02de9a42111111111",
]Can use expression. (In the above example, it use splat expression.)
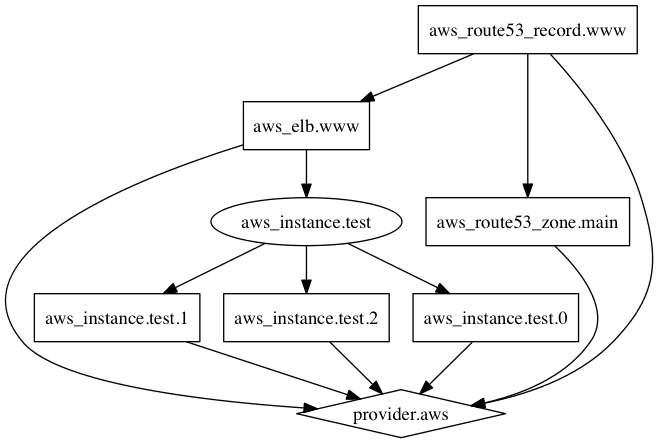
terraform graph
terraform force-unlock
Remove the lock on the Terraform state for the current configuration.
Another option is to use the terraform state rm command followed by the terraform state push command to forcibly overwrite the state on the remote backend, effectively removing the lock.
It's important to note that these commands should be used with caution, as they can potentially cause conflicts and data loss if not used properly.
terraform output
Display the values of outputs defined in the Terraform configuration. Outputs are a way to extract and display information about your infrastructure after it's been created or modified by Terraform.
-auto-approve flag
This command flag is used in apply and destroy without requiring manual confirmation for execution.
Terraform variable
TF_LOG
Terraform has detailed logs that can be enabled by setting the TF_LOG environment variable to any value. This will cause detailed logs to appear on stderr.
You can set TF_LOG to one of the log levels TRACE, DEBUG, INFO, WARN or ERROR to change the verbosity of the logs. TRACE is the most verbose and it is the default if TF_LOG is set to something other than a log level name.
TF_VAR
Terraform allows you to use environment variables to set values in your Terraform configuration. This can be useful for specifying values specific to the environment in which Terraform is running or providing values that can be easily changed without modifying the Terraform configuration.
To use a variable in Terraform, you need to define the variable using the following syntax in your Terraform configuration:
variable "instructor_name" {
  type = string
}
You can then set the value of the environment variable when you run Terraform by exporting the variable in your shell before running any Terraform commands:
$ export TF_VAR_instructor_name="bryan"
$ terraform apply
terraform block
The terraform block is used to declare settings and behaviors specific to Terraform itself. This block is typically used to set the Terraform version, define backend configurations, and specify provider requirements for the entire configuration.
ex).
terraform {
  required_version = ">= 0.12.0, < 0.13.0"
  backend "s3" {
    bucket = "my-terraform-state"
    key    = "terraform.tfstate"
    region = "us-west-2"
  }
}
required_providers block
This block allows you to specify the provider's name and the version range you want to use by using Terraform's version constraints syntax.
ex).
terraform {
required_providers {
aws = {
source = "hashicorp/aws"
version = "3.57.0"
}
}
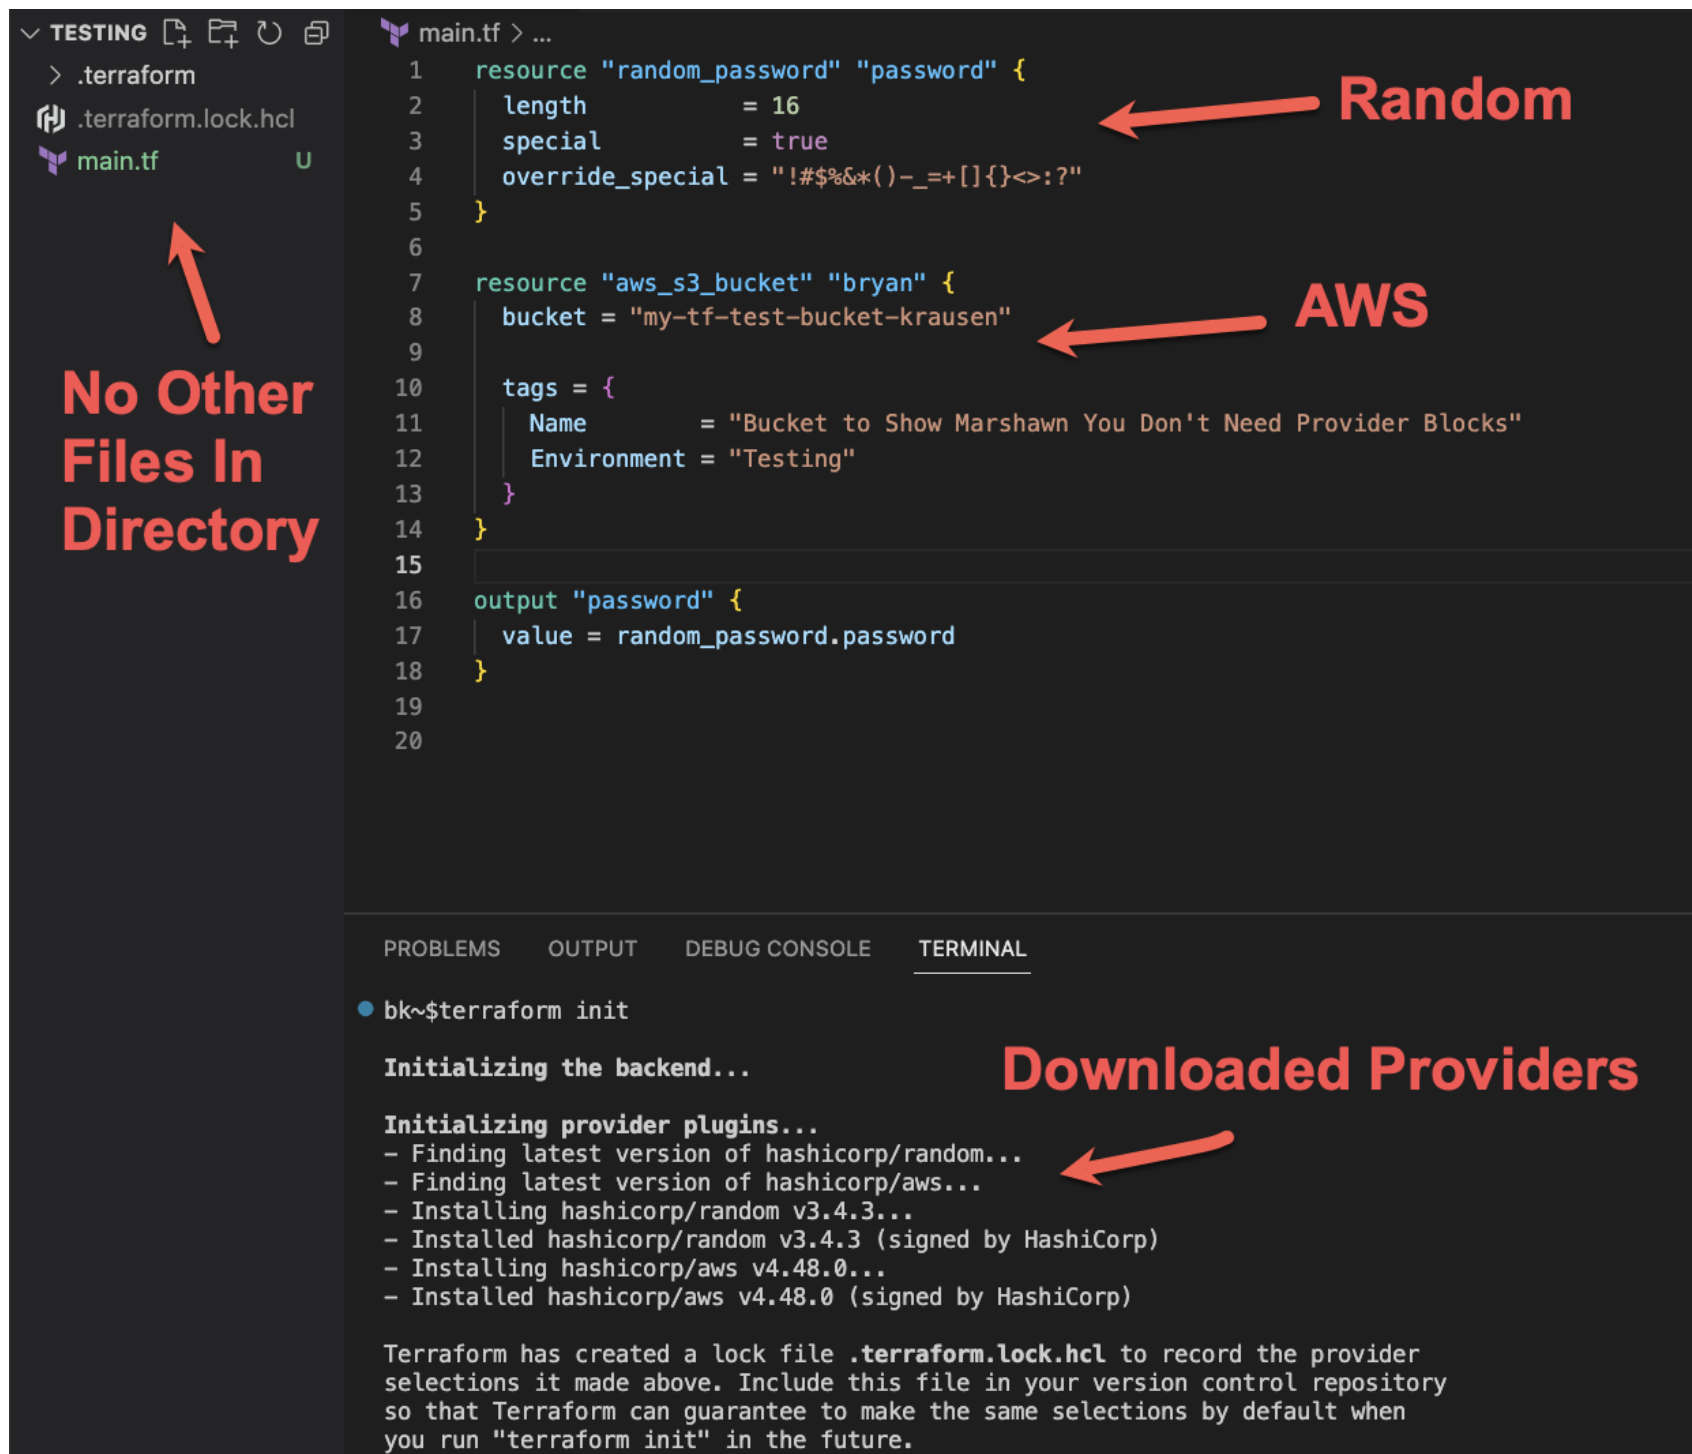
} provider block
Write more detailed setting for provider defined in required_providers.
ex).
provider "consul" {
  address = "https://consul.krausen.com:8500"
  namespace = "developer"
  token = "45a3bd52-07c7-47a4-52fd-0745e0cfe967"
}

provider "vault" {
  address = "https://vault.krausen.com:8200"
  namespace = "developer"
}
While it is a best practice to include a provider block for each unique provider in Terraform code, it is not a strict requirement. Terraform can automatically detect and use providers based on the resource configurations defined in the code. However, explicitly defining provider blocks enhances code readability and helps avoid potential conflicts or ambiguities in resource management.
data block
n Terraform, data blocks are used to retrieve data from external sources, such as APIs or databases, and make that data available to your Terraform configuration. With data blocks, you can use information from external sources to drive your infrastructure as code, making it more dynamic and flexible.
For example, you can use a data block to retrieve a list of Amazon Machine Images (AMIs) from AWS, and then use that data to select the appropriate AMI for a virtual machine you are provisioning:
data "aws_ami" "example" {
  most_recent = true

  filter {
    name   = "name"
    values = ["amzn2-ami-hvm-2.0.*-x86_64-gp2"]
  }

  filter {
    name   = "virtualization-type"
    values = ["hvm"]
  }
}

resource "aws_instance" "example" {
  ami           = data.aws_ami.example.id
  instance_type = "t2.micro"
}
In this example, the data block retrieves the most recent Amazon Linux 2 HVM AMI, and the aws_instance resource uses the selected AMI to create a virtual machine.
Data blocks can be used to retrieve information from a wide range of sources, such as databases, APIs, and cloud providers. This information can then be used to conditionally create, update, or delete resources, making your Terraform configurations more flexible and adaptable to changing requirements.
import block
Import existing resources into the Terraform state.
A common pattern is to create an imports.tf file, or to place each import block beside the resource block it imports into.
ex).
import {
  to = aws_instance.example
  id = "i-abcd1234"
}

resource "aws_instance" "example" {
  name = "hashi"
  # (other resource arguments...)
}
moved block
When you want to rename existing resource without make any change or recreate.
参照
ex).
Firstly create aws_instance.a
resource "aws_instance" "a" {
  count = 2

  # (resource-type-specific configuration)
}
Then you want to change the name from a to b.
resource "aws_instance" "b" {
  count = 2

  # (resource-type-specific configuration)
}

moved {
  from = aws_instance.a
  to   = aws_instance.b
}
alias
An alias meta-argument is used when using the same provider with different configurations for different resources. This feature allows you to include multiple provider blocks that refer to different configurations. In this example, you would need something like this:
provider "aws" {
  region  = "us-east-1"
}

provider "aws" {
  region = "us-west-1"
  alias = "west"
}
When writing Terraform code to deploy resources, the resources that you want to deploy to the "west" region would need to specify the alias within the resource block. This instructs Terraform to use the configuration specified in that provider block. So in this case, the resource would be deployed to "us-west-1" region and not the "us-east-1" region. this configuration is common when using multiple cloud regions or namespaces in applications like Consul, Vault, or Nomad.
for_each
When using a for_each argument in a resource block, you can refer to the key and value like each.key, each.value.
In blocks where for_each is set, an additional each object is available in expressions
ex).
# ex1). Map
resource "azurerm_resource_group" "rg" {
  for_each = tomap({
    a_group       = "eastus"
    another_group = "westus2"
  })
  name     = each.key
  location = each.value
}

# ex2). Set
resource "aws_iam_user" "the-accounts" {
  for_each = toset(["Todd", "James", "Alice", "Dottie"])
  name     = each.key
}How to reference ex).
You can reference subnet_b in an output block like aws_subnet.private_subnets["subnet_b"].id.
aws_subnet.private_subnets is the resource map and ["subnet_b"] accesses the specific subnet by its key. .id retrieves the subnet’s ID.
variable "private_subnets" {
  type = map(number)
  default = {
    subnet_a = 1
    subnet_b = 2
  }
}

resource "aws_subnet" "private_subnets" {
  for_each          = var.private_subnets
  vpc_id            = aws_vpc.vpc.id
  cidr_block        = cidrsubnet(var.vpc_cidr, 8, each.value)
  availability_zone = tolist(data.aws_availability_zones.available.names)[each.value]

  tags = {
    Name      = each.key
    Terraform = "true"
  }
}
count
ex).
resource "aws_instance" "server" {
  count = 4 # create four similar EC2 instances

  ami           = "ami-a1b2c3d4"
  instance_type = "t2.micro"

  tags = {
    Name = "Server ${count.index}"
  }
} count.index: The distinct index number (starting with 0) corresponding to this instance.
count is not recommended. It is better to use for_each.
Terraform Expressions
Splat Expressions
Provides a more concise way to express a common operation that could otherwise be performed with a for expression.
ex).
var.list[*].id

# equal to
[for o in var.list : o.id]
https://developer.hashicorp.com/terraform/language/expressions/splat
dynamic Blocks
ex).
resource "aws_security_group" "example" {
  name = "sg-app-web-01"

  dynamic "ingress" {
    for_each = var.service_ports
    content {
      from_port = ingress.value
      to_port   = ingress.value
      protocol  = "tcp"
    }
  }
}
https://developer.hashicorp.com/terraform/language/expressions/dynamic-blocks
terraform function and expression
- function: ex).
min,max,format,join,trim,length - expression: ex).
string,number,bool,null
Terraform File
terraform.tfstate
By default, Terraform stores the state in a file named terraform.tfstate in the current working directory. The state file in Terraform is formatted using JSON.
Community and HCP
In HCP Terraform, a workspace can be mapped to how many VCS repos?
1
In HCP Terraform, a workspace can be mapped to only one VCS (Version Control System) repository. This means that the workspace will be associated with a single repository where the Terraform configuration files are stored and managed.
workspaces in the Community and HCP Terraform.
Workspaces, managed with the terraform workspace command, isn't the same thing as HCP Terraform's workspaces. HCP Terraform workspaces act more like completely separate working directories.
CLI workspaces (Community) are just alternate state files.
HCP access with CLI
HCP Terraform can be managed from the CLI by using an API token which can be generated in the HCP Terraform UI. The API token serves as a secure way to authenticate and authorize CLI access to HCP Terraform resources and operations.
Migrate Terraform Community (Free) to HCP Terraform. After the initial configuration, you create a workspace and migrate your existing state and configuration. What Terraform version would the new workspace be configured to use after the migration?
The same Terraform version that was used to perform the migration.
Where does Terraform Community (Free) store the local state for workspaces?
Directory called terraform.tfstate.d/<workspace name>.
For local state, Terraform stores the workspace states in a directory called terraform.tfstate.d/<workspace_name>. Here's a screenshot of a Terraform run that was created using a workspace called training. You can see that Terraform created the terraform.tfstate.d directory, and then a directory with the namespace name underneath it.
Under each directory, you'll find the state file, which is name terraform.tfstate

Terraform Services
HCP Terraform agents
HCP Terraform agents are primarily responsible for executing Terraform plans and applying changes to infrastructure (ex). on-premise). They act as the bridge between the HCP Terraform service and the target infrastructure, ensuring that the desired state of the infrastructure is achieved based on the Terraform configuration.
Sentinel, Open Policy Agent (OPA)
Both tools allow you to define custom policies to evaluate and control Terraform configurations before they are applied. Both offer powerful capabilities to enforce custom policies on your Terraform configurations, providing an additional layer of security and governance. By leveraging these tools, you can prevent sensitive information or undesired strings from being present in your infrastructure code, reducing the risk of accidental misconfigurations and potential security vulnerabilities.
https://developer.hashicorp.com/terraform/cloud-docs/policy-enforcement/opa
The steps of running Sentinel policies and OPA
- Sentinal
Sentinel policy evaluations occur after Terraform completes the plan and after both run tasks and cost estimation but before the apply phase.
This allows for the policies to be evaluated against the planned changes before they are actually applied to the infrastructure, ensuring standardization and security controls are met. This order also lets you write Sentinel policies to restrict costs based on the data in the cost estimates.Plan → Run tasks → Cost estimation → Sentinel → Apply
- OPA
OPA policy evaluations are slightly different and occur after Terraform completes the plan and after any run tasks. Unlike Sentinel policies, HCP Terraform evaluates OPA policies immediately before cost estimation.Plan → Run task → OPA → Cost estimation → Apply
Sentinel policies developed language.
- HCL (HashiCorp Configuration Language)
- JSON
Terraform Knowledge
By default, how many resources will Terraform provision concurrently during a terraform apply?
10
Terraform Public Registry rule
- Module repositories must use this three-part name format,
terraform-<PROVIDER>-<NAME>. - The registry uses tags to identify module versions. Release tag names must be for the format x.y.z, and can optionally be prefixed with a
v.
For example,v1.0.4and0.9.2 - The module must be on GitHub and must be a public repo.
Using Terraform to interact with sensitive data like secrets from Vault can lead to the secrets being persisted to the state file.
Secrets Persist in the State File
- Terraform stores all resource attributes in the state file, including any sensitive data retrieved from Vault.
- If Terraform fetches a secret (e.g., database passwords, API keys) from Vault, it may be written in plain text inside the state file.
- Example risk:
- If you use
vault_generic_secretto fetch a secret, it might appear in the.tfstatefile.
- If you use
How to Mitigate These Risks?
- Enable State File Encryption: Store state files in Terraform Cloud, AWS S3 with encryption, or HashiCorp Consul instead of local storage.
- Use Data Sources Instead of Directly Storing Secrets: Use AWS KMS, GCP KMS, or Vault’s encryption capabilities to encrypt state files.
- Restrict Access: Instead of fetching secrets and storing them as Terraform resources, use Vault’s dynamic secrets or short-lived credentials.
- Use Terraform’s Sensitive Attribute: Apply strict IAM policies and RBAC rules to limit access to Vault and Terraform state files.
- Mark outputs as
sensitive = trueto prevent them from being logged in Terraform CLI output.
Waht Terraform files should be ignored by Git when committing code to a repo?
-
.terraformdirectory: This directory contains local Terraform state files, which should not be committed to the repository. -
terraform.tfstateandterraform.tfstate.backup: These files contain the current state of your infrastructure, and should not be committed to the repository. -
.tfvarsfiles: These files may contain sensitive information, such as passwords or API keys, and should be kept out of version control. Instead, you can use environment variables or other secure methods to pass this information to Terraform. -
.tfplanfiles: These files contain the plan generated by Terraform when applying changes to your infrastructure, and may include sensitive information such as resource IDs. They should not be committed to the repository.
To ignore these files in Git, you can add them to your .gitignore file.
When using Terraform, where can you install providers from?
- plugins directory
The plugins directory is a local directory where Terraform looks for provider plugins. By placing provider plugins in this directory, Terraform can use them without needing to download them again. - Terraform plugin cache
The Terraform plugin cache is a local cache where Terraform stores downloaded provider plugins. It can be used to install providers that have been previously downloaded and cached for faster access. - official HashiCorp releases site
The official HashiCorp releases site is a trusted source for downloading official provider releases. Installing providers from this site ensures that you are using stable and tested versions of the providers. - Terraform registry
The Terraform registry is the official repository for Terraform providers. It is the recommended source for installing providers as it ensures compatibility and reliability with Terraform configurations.
Operating systems that Terraform is available for.
- Windows
- Solaris
- Linux
- FreeBSD / OpenBSD
- macOS
Default action after approving a merge request in Github repo which HCP Terraform workspace linked to.
HCP Terraform will run a speculative plan to show the potential changes that will be applied to the managed environment. This allows users to review and validate the changes against any applicable Sentinel policies before applying them.
The difference between map and object.
Both of them looks like {<KEY> = <VALUE>}.
For map, the key should be string and all the value should be the same time. But for object, there is no constrain like that.
ex).
locals {
  name_map = { # Map
    "dev1" = "develop1"
    "dev2" = "develop2"
    "dev3" = "develop3"
    "dev4" = "develop4"
  }

  test_object = { # Object
    test_string = "string"
    test_value  = 1
    test_list   = ["list1", "list2"]
    test_bool   = true
    1           = "one"
  }
}